Preparing your document properly is the most important part of the printing process. Remember, we print directly from your file without altering it in any way. At Graphictek Solutions we want to make sure that you are completely satisfied with our work. For this reason, we are including the following guidelines that you must follow when submitting your printing work to us. You should download our “How To Prepare Checklist” to make sure that you are complying with all of the requirements.
We recommend that you read this entire page and become familiar with all of our requirements. You may also click on a topic below to read about that specific area.
Software
Preparing your job correctly is the most important part of getting good results. Graphictek Solutions accepts files from both Macintosh and Windows platforms. We accept files from the following programs as long as they are converted to PDF, TIFF, JPG or EPS:
| Software | Output in CYMK |
| Adobe Photoshop | Photoshop TIF, 300 dpi, CMYK colors*. Please make sure that you leave an additional 1/8th of an inch all around for bleeding if your document bleeds. |
| Adobe Illustrator | Illustrator EPS, Set all fonts to outlines. If you’re exporting an Illustrator file to TIFF Please make sure that you leave an additional 1/8th of an inch all around for bleeding if your document bleeds. |
| Adobe inDesign | Set all fonts to outlines and embed all Links (all colors and images in CMYK). Please make sure that you leave an additional 1/8th of an inch all around for bleeding if your document bleeds. Export as a PDF or an EPS. |
Document Size
For a thorough understanding of the various sizes of documents that Graphictek Solutions can print, please view our price list for a guide. You may also download our layout templates for some of the most common sizes and design tips.
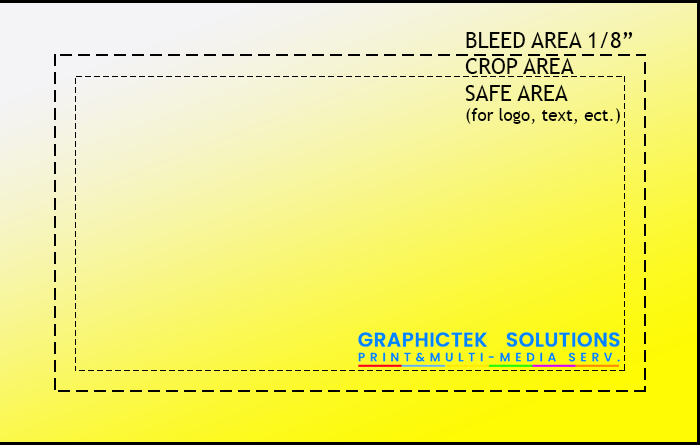
When you select the size of the document you need, please make sure that you leave an additional 1/8th of an inch all around for bleeding if your document bleeds. This will ensure that your entire art and text will be visible once it is cut to it’s final size. Make sure, however, that no important art or text is in the bleeding area. You should also have at least 1/8″ inside the final size (see graphic below). When using a border, remember it may be unequal either top to bottom or side to side due to minor, inevitable movements in the press and in the cutters.
What’s a bleed?
The paper is trimmed after printing to insure the ink runs fully to the edge and not stopping short of it.
Why Bleed?
The purpose of a bleed is to continue a color, image or design off the edge of the card.
Is it required?
Yes. If there is a color, an image or design that goes to the edge of the document. A document with a white background with no image or design that goes beyond or to the edge does not require a bleed.
For Example
If you final size is to be 3.5″ x 2″. You may then set your guides to 1/8″ outside of the document bounds all around the document. Background colors and other designs may extend to these external bounds (bleed), but no important artwork or text should be in this area as it will be cut off.
You should ALSO leave yourself at least 1/8″ from the edge of the final document size to where the important information or artwork begins inside the bounds of the document. This is visible in the graphic below as the “SAFE TEXT AREA”. This means that the area where important artwork (logos, text, etc.) and information will reside on an 3.5″ x 2″ has an actual size of 3.375″x1.875″. Graphictek Solutions is not responsible if important artwork or text extends beyond these specifications and is cut off!
When exporting images to TIFF always make sure the Anti-Alias setting is active. This will make the text look significantly better and the overall card look much nicer. For more information on Anti-Alias click here.
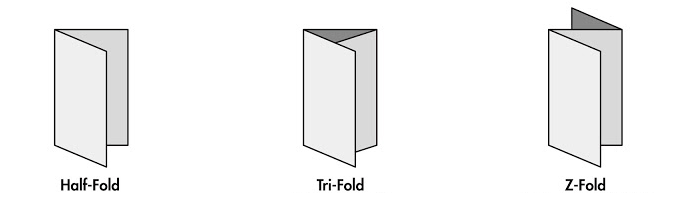
Folding
When designing jobs that must be folded, the setup and positioning are probably the most important factors. When designing Half Folds or Half and Half Folds (also known as double parallel fold) the simple way to do it is dividing the page in half with a guide and then positioning text and objects where they should. This is simple because for example dividing an 8.5 x 11 in half is either 4.25 or 5.5. Now it gets a little interesting when you try to divide a Tri-Fold by 3, using inches. 11 divided by 3 equals 3.666. As you can see it doesn’t divide evenly. The best solution to the problem is to change the document settings from inches to PICAS. Once in picas, the 11 inch side turns into 66 picas, of course it doesn’t change the overall size. Now dividing 66 picas by 3 is 22. What you would do know is place guides on the 22 picas mark and 44 picas mark. Now you can go back to inches or continue in picas and the document is 100% evenly divided now and ready for designing.
Images and Resolution
All images must be submitted at 300 dpi at 100% scale (of the print size) and must be submitted in uncompressed TIFF format without layers (flattened). They must all be converted to CMYK colors.
Remember, a higher quality image resolution does not always result in better print quality. Excessive images resolutions (beyond 300 dpi) will only dramatically increase your file size and in most cases will not improve the print quality. Furthermore, the extra time required to handle these larger files could delay your turnaround time.
Vector-based graphics suitable for type and logos should be submitted at 100% scale and converted to EPS CMYK format with all fonts converted to outlines. Graphictek Solutions will not be responsible for output from an EPS which contains fonts that are not converted to curves.
Images from a Digital Camera
Start with a good image. A good print starts with a high-quality image. One that merely looks good onscreen is not enough.
Before use images from a digital camera, make sure the camera is set at a high resolution to result in 300 PPI at the intended photo print size. Most cameras have various settings for resolutions. The highest resolution for your camera depends on how many Megapixels it has. You cannot increase the resolution of a photo after it is taken, except by reducing its dimensions.
Best Format
Even if your image is high resolution, you’ll still need to save it in the correct file format: TIFF. Always save your pictures in the TIFF format, Do not use LZW, JPG or any other type of compression offered by your software.
RGB colors are those used by most digital cameras. It is NOT, however, used for printing color output. They must all be converted to CMYK colors.
Images from Scanner
Like a digital camera, a scanner must be preset to the proper resolution before image capture. Many scanners default to 150 PPI (or SPI) and RGB input. Set your scanner’s resolution so that it results in 300 PPI at the image’s final print size. Always save your pictures in the TIFF format, and they must all be converted to CMYK colors.
Images from Internet
Images found on the Internet are typically at a resolution of 72 PPI. This resolution is much too low for quality printing. In addition, most images on the Web are protected by copyright laws. For these reasons, we do not recommend using images from the Web.
Anti-Alias
To diminish the stairstep-like lines in images that should be smooth, by surrounding the jagged edges with shades of color. Anti-alias should remain checked because it smoothes the contours of the elements, it makes anything you draw (bitmap) look smooth and not jagged (like steps) at the edges.
You will see the difference when you add text to a graphic.

Color
We do not print PMS colors! The PMS and Pantone colors need to be converted to CMYK colors. Please, never submit anything using RGB, Pantone or PMS colors! We also cannot accept spot colors, only process colors. Our presses will automatically convert Pantone, PMS, RGB and spot colors to 4-color tints, but the results are often undesirable. Avoid unexpected results by designing and submitting your files in CMYK only.
What are CMYK Colors? | What are RGB Colors? |
Most color presses (including those used by Graphictek Solutions) use the combination of these four colors (Cyan, Magenta, Yellow and Black) to create full color output. Even simpler desktop color printers (such as Laser and Inkjet printers) rely primarily on the combination of these four inks to create full color output. | RGB colors are those used by most computer monitors and televisions to display full color. It is NOT, however, used for printing color output |
All work submitted to us must be converted to CMYK.
Rich Black
To obtain the richest possible black, all heavy blacks and defined text over 24 pt needs to be configured with the following color combination:
- Cyan: 60%
- Magenta: 50%
- Yellow: 50%
- Black: 100%
Also remember that you should never set any color to overprint unless it is black. When a color is placed on top of a dark one, the dark one will always be dominant and will always overprint the light one causing the color to print incorectly.
Fonts
Please convert all fonts to outlines. Fonts that are used in QuarkXpress need to be submitted along with your file. We must receive both the screen and printer fonts used in your file (Collect for Output). Also, don’t forget to convert to outlines or curves fonts included in your graphics.
We are able to accept fonts for the Macintosh as well as Windows. We can also accept the new cross-platform OTF fonts. Make sure that when you submit your file you let us know which platform you used to create your job.
A PDF (with fonts embedded) or a hard copy of your work is mandatory for QuarkXpress files for us to ensure that we’re printing what you want the way you want it.
Compression
We request that you send any pictures and graphics in either TIFF or EPS format. Do not use LZW, JPG or any other type of compression offered by your software (Photoshop, Illustrator, etc.) for these types of files.
When you are ready to send your file to us, please compress all your files (document, fonts, images, etc.) into ONE archive. Newer versions of Windows and the Mac OS include compression software so that you can create ZIP files right from the desktop.